Tuesday, November 25, 2008

Smocking, Pockets, Patrones, and Weights

May very kindly offered me an extra copy of the September Patrones and of course I jumped at it. It's a great issue, with a special section of coats and also of high-waisted skirts and pants as well as the usual mix of garments. It's so interesting to see the designer garments they feature. I will have a hard time deciding on one garment to try first. You can see the issue in the photo below, along with several other interesting things.


I got more weights from my darling brother. I especially like the smaller, amoeba-shaped ones. They fit nicely in the hand, and are a perfect shape for corners of pattern pieces, and for odd curves, etc. They're so nicely polished and smooth and just kind of fun to hold. Like the first long strips, they're stainless steel, as are the narrower, curved-end strips at the top.

I went to a Sewing Guild meeting last night, and our program was so good. Carla Fiedler, one of our members, is a very serious smocker. She did a Trunk Show for us, showing probably 25-30 smocked garments and a few purses, pillows, Easter eggs, and heirloom quilts incorporating smocking that she'd made. Very inspiring, as all of her construction is just as meticulous and beautiful as her smocking. The group's choice for most fabulous piece was a First Communion dress in silk with smocking as well as many heirloom techniques which she made for one of her daughters. It was just breathtaking, and obviously an heirloom in its own right.

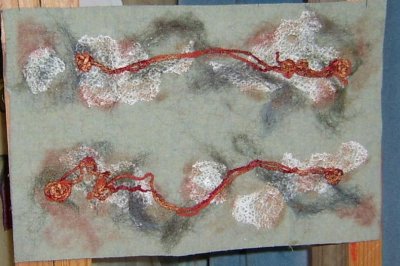
She then taught a short introduction to smocking. She provided pleated swatches, or as she called them "doodlepatches" and needles threaded with floss. We learned to do an up-cable and down-cable and traveling stitches. I can see that it would be fun to do a real project, and was especially intrigued by a photo of somewhat abstract smocking from an Australian Smocking & Embroidery magazine she passed around.

I learned two other related techniques that were new to me as well. One is a method of knotting your thread that's very much like a french knot, and the other was a method of separating strands of floss called "Strip and Squeak". It's been a long time since I separated floss, but I always have just done it the way my grandmother taught me when I was a little girl. This is much more fun, and looks like a better method as well.

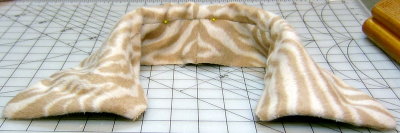
Finally, a photo of some coat progress. This is the interfacing attached to one pocket and flap. Since the photo was taken, they've both been finished, the edges pressed in place, basted, topstitched and ready for the lining. I need to cut out my lining for everything so I don't do the pocket pieces from the wrong spot.


Although The Peep was on his appointed rounds again last night, I'm glad to announce that there were no gifts in the garage this morning. After reading the comments from all of you cat lovers, I'm relieved that he didn't bring the rabbit into the sewing room for safe-keeping. Not that he had the chance, thank goodness.

Last of all, I ordered something today that I've been wanting for a long time. I've been suffering with an iron on its last legs for quite a while now (it got knocked off the ironing board, and since then the steam only works when you push the burst-of-steam button, but then the button won't come back up so you have to reach in with a pair of tweezers and pull the stem of the button back up - see how I suffer!) and its replacement is on the way. I took a recommendation from a Guild friend on what to get, so I hope I like it as much as she does. You will see it when it arrives.

Posted by Picasa

Monday, November 24, 2008

Progress and Weirdness

I'm very pleased with my coat progress yesterday. I cut off the extra fabric at the fronts, cut out the pockets and flaps (they seem to match very well,) and got one pocket/flap pair interfaced and the edges pressed.

Before I got brave enough to cut the pockets, I procrastinated by ironing 20 shirts. Now you know that means I was willing to do anything rather than start in on the cutting. Pearle was happy with his shirts though, and I admit half of them were mine that had been waiting to be ironed, so it was equal opportunity wrinkles for a while there. I don't wear shirts as much in the winter though since I like something warmer, so probably he suffered more than I. He does have a few other shirts though.

So. On to the weirdness. Our cat, The Peep, likes to stay out all night, or at least the late night through to morning, even when it's pretty darn cold, and he's a hunter. He can come into the garage to wait to get into the house in the mornings, and a lot of times he's snoozing out there when we open the door, but this morning, we found a "present" from him. He popped right in and went and drank some milk, leaving his very large rabbit out in the garage. I'd show you a photo, but it's pretty graphic. I moved the car out to clean up, and honestly, they could have filmed an episode of CSI out there! Generally he eats his catches and there's not much left but a smear here and there, although they're usually smaller. I think. Maybe this was his second catch of the night or something, because it was pretty complete still and he had no further interest in it. It was just me, the Windex, Clorox Wipes, Lysol and paper towels. I'd just as soon he left his 'trophies' elsewhere.


The Peep


"Nature Red in Tooth and Claw" around here. Definitely. He is a very nice, smart cat who knows his business, and I have to say there's very little rabbit, shrew or ground squirrel trouble in my garden, and he seems to leave the birds alone for the most part.

Now, back to cashmere, with relief.

Thursday, November 20, 2008

Coat Progress Report

Yes, I'm back to working on my coat, although it's been a harrowing process, and although life has definitely gotten in the way, I will finish this.

I've been somehow unwilling to take the next steps with it, and I finally decided that it's because I don't like the extra I added to the front per Roberta Carr's instructions. After careful looking, pinning and checking of both the muslin version and the actual coat in process, I've decided to cut off the extra and go with the original Marfy drafting. I don't know why I thought I should try to improve on them, they obviously know more than I do. Why did I not listen to Ann Rowley, who some time ago very kindly noted that this was NOT the way coats were done anywhere she's been. They always tape the edge and pull up on the tape if it wants to swing open. After my testing, I suspect that Marfy has already taken the whole issue into account somewhat anyway. So, as usual, I make work for myself that I don't need.

Part of this epiphany came about after I pulled out my corduroy/suedecloth Marfy carcoat I made last year and thought about it as I wore it. It's about the same circumference or narrower than the cashmere, and seems to be fine, even though I whacked it off shorter than designed. I had forgotten how much I like it until I put it on again. I do wish I had done padstitching in the lapels, but I didn't really know enough I guess. I'm now wondering if I could do a little remedial stitching invisibly through the back of the lapels and get results. Any opinions, or even the voice of experience? I'd love to know.

I also have been working on cutting the patch pockets and flaps, and realized quickly that I really can't match the pattern perfectly since there's a dart that ends below the top of the pocket. So, I'm going to match the front and lower edges of the pocket and match the flap to the pocket and call it good. As busy as the pattern is, I think that will be fine. I only get one chance with this since the repeat is large, and I have to have a pocket and flap that match on each side, and I don't believe there is enough fabric to do another set. I'm going to trace 2 copies each of the pocket and flap pieces so I can place them all before I cut.

So, work is progressing, although not as quickly as I could wish. I don't want to rush though, or try to do tricky things (like match and cut out the pockets) at less than optimum times, like late at night when I'm too tired to realize I'm too tired to do things right.

Sunday, November 16, 2008

Finally Finished with the Bazaar


Here is the finished pair of cuffed gloves. I finished the second one much more quickly than the first, since it was simply a matter of repeating the steps. Here's the pair as worn.

Green Gloves

The green pair sold, as did the purple below. They're a completely different style, with a plain outer cuff faced with a rayon batik.


And once again, as worn.

Purple Gloves

I came home with only 2 scarves and 3 dishcloths that didn't sell, so I feel like it went well, and the best part is that now I can go back to concentrating on my coat. The poor sleeves have been sitting there ready to set in for a week now, and I'm ready to get on with it.

I am thinking of doing a pair or two of the cuffed gloves for Xmas gifts. They're fairly quick, and rather fun to do.

Sunday, November 09, 2008

Bazaar Things


Photo Link

I'm donating things to sell at a fundraiser for my local chapter of Mu Phi Epsilon again this year, and I've knitted a bunch of scarves for it, but wanted to do something different too. After seeing a cuff (bracelet?) on a blog, I decided it would be fun to do very fancy cuffs to attach to gloves. The piece above is what I did for this. It's for a pair, and is a wool Melton with lace, roving and yarn attached using the Embellisher. I also used Shiva Paintsticks in gold and copper on them. Here's the first finished one. I think they're kind of fun.


Photo Link

Photo Link

I lined them with a rayon twill, added a couple pleats and 3 buttons. I'm sure the second one will go much faster, as the hard part was figuring out just exactly how to attach them to the gloves. I'm using the little knitted "magic gloves" you find everywhere since I wanted these to be one-size, and I didn't want to put a lot of money into the gloves. They could easily be removed from these and put on any gloves, as they're just handstitched. If the other one turns out as well, it's going to be hard to let them go. Now I have to figure out what to price them at.

For a little quicker item (I hope) I am going to try to copy Barbara's gift pouches at Cat Fur Studio. I think these would be good sellers, and I hope I can do some as nice as hers.

As an experiment, I also have begun to work on a beaded necklace that has the large fabric pieces that I've seen in some designer shows. I think I'm going to add a chain twisting through the yarns to add a little more weight. Both sides of each piece is beaded, so no matter how they hang, it's the "right" side. I think a ribbon bow or two may go on this too.
xxx 

xxx 
Posted by Picasa

Monday, November 03, 2008

Perfect Isn't Perfect, Part 2

You may remember a post from July, 2008 called Perfect Isn't Perfect Anymore. It was about the new designer at Valentino and her first couture collection for the house. There were a lot of great comments about it, and we were all agreed that it was a big change from previous Valentino collections.

Well, you may have noticed that the designer who did the collection, Alessandra Facchinetti, is no longer at Valentino. She was touted as the one who would update the house and its image, but apparently there was unhappiness with her work or the way things were going in general.

I probably wouldn't have done a post just about that, but Kathleen Fasanella, of Fashion-Incubator fame left a comment recently on the original post which I'm going to quote here. You can use the link to the original post above to see the photos to which she refers. As always, she is very good at diagnosing problems and not only how they got there, but how to fix them. Here's her comment, and be sure to click on her link to see the photos with comments and arrows, etc. on her photo site.

kathleen said... 1:30 PM, October 17, 2008

Good eye Liana (as usual).
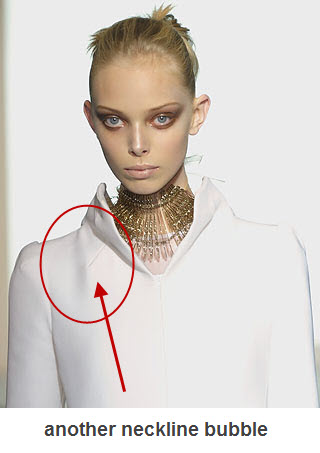
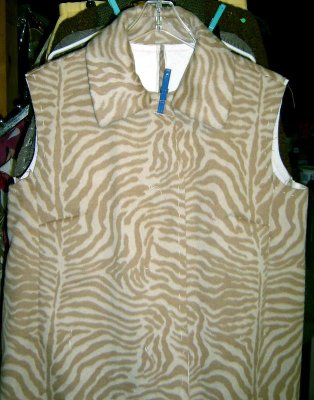
Don't know that I agree about the collar points, could be a matter of garment sway from walking but I do see another problem with it, bubbling on one side near the dart (see these photos I've made notes on.)


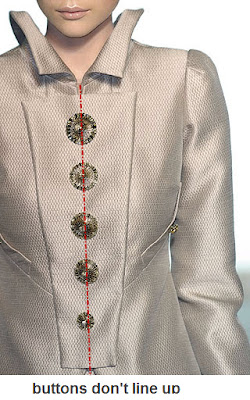
The taupe style ...that has GOT to be a proto, a last minute addition to the line. I found three problems with it, rather glaring imo. The buttons don't line up,


the aforementioned neckline bubble (same block as the white one?)


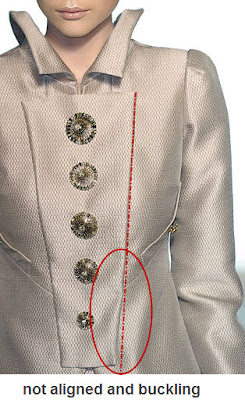
and that placket thingy in addition to buckling, is crooked.


Again, see my photos.

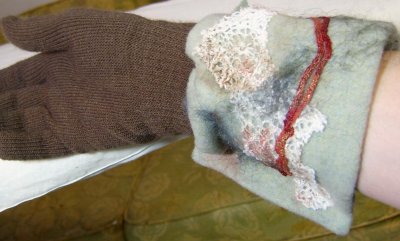
RE: zipper. The end point pucker is the least of it really, you can see it's puckering well before that end point. Pretty lousy imo. Also, look at that seam on the sleeve; it's caving inwards.


With all that embellishment weight, that really needed some kind of infrastructure to reinforce the seam.


I was very interested in her comments, and I admit I hadn't consciously noted the neckline bubbles, at least as a separate problem. The beige suit being a very quickie prototype rings true with me, as the placket itself looks like the kind of thing I would just fold from a scrap to see how I liked the look. It looks like they did that too, and then just tacked it on without interfacing it or figuring out how to attach it beautifully, and called it good for now.

Kathleen has graciously offered to elaborate if we have any questions, so please, ask away!


Edited to add the photos with Kathleen's notes, which I should have done in the first place.


Coat Progress


Coat Photos Link

Finally, a progress report on the cashmere coat. It's coming along pretty well, if by fits and starts. The photo above is of the coat body after underlining, with the collar just sitting on the coat with a pin on each side at the front. Notice how beautifully it works. I padstitched the undercollar and stand, but I think the fact that the collar is designed with a separate stand has a lot to do with the way it looks. It just has to have the perfect shape because it's designed right into it. Here's the collar sitting on a table after it's been stitched and turned, and with the upper and under stand seams pinned together.


I agonized quite a bit over the layout and cutting. I have to say I'm pleased as punch with the way the pattern match came out. I did try really hard to get it right, but there's always an element of luck that plays into it, I think. Anyway, it came out almost perfectly. I have to think that one of the reasons this fabric was expensive is because they used a fabric designer who made it possible to get this really great match. Here's a close up of the match on the side back and center back seams.


Tomorrow there probably will not be any sewing done because we're having a new furnace put in, and it's right down by my sewing area. I'm going to move a lot of things, and cover everything I don't move with sheets so I don't have to worry about dust on everything. At least I hope I won't.